 Fuzzy's
Lil' Stove
Fuzzy's
Lil' Stove
A.K.A. (Also Known As)
How to make an Alcohol Stove
from a Soda Can.
The stove will weigh less than 10 grams, ~1/3 of an ounce.
Using about 1 ounce of 70% Isopropyl (Rubbing) Alcohol it will boil
a pint (500 ml) of water in ~ 6 minutes. (At sea level.)
All photos maybe clicked on to view the image
in full size,
then use your browser's 'BACK' button to
return.
Best viewed in 800x600 or higher
Updated 2000DEC31 - added: Smaller photos
and click to enlarge.
Links:
GHA-Barter Supplies
home page
Our Shopping page
Our Links page
Our Books page
Our Cloth Diaper
page
A month's supply
of food in a box under your bed!
A great source for
making other types of home made stoves. In Italy - The Wings Archive
-- Thanks Wings!
Another great
source of info Camping and Photos. In Japan - Super Shioshio's page
Backpacking
Light discussion group This is hosted on egroups, aka onelist.
Just got this link, so I've not fully checked it out. Onelist is
a great resource.
Want
50 megs data free on the internet?
Rules:
This project must be done under parental supervision!
This project is for intelligent and careful ADULTS, if you don't fit
into ALL of the previous categories DO NOT attempt this project
-- You agree to assume all legal, moral, financial and medical responsibility
should you attempt this project. You also agree that the total liability
of this product is the amount paid; i.e. free advice is worth what you
pay, and hopefully more.
Wear Work Gloves AND Safety Glasses while making this stove, you will
be working with very sharp edges
Use the stove outdoors with a 5 gallon bucket of water or garden hose
and a fire extinguisher to put out any unexpected fires.
Keep away from children! Sharp edges, fire and poison are not
for little ones.
Use only outdoors, in a safe large fire pit area, never in a drought
/ fire hazard situation.
This stove will run on 70% Isopropyl Alcohol, this is the only fuel
I have tested it on.
DO NOT use of anything else!
If you get aluminum hot enough it will actually burn, so please don't
use any other fuels.
The stove is very hot after use, handle with care.
Never move the stove while it is ignited.
Okay, now that my lawyer is happy, let's get down to business.
This project will take about 20 minutes to do, mostly to gather the
tools.
I hope you only need to use this stove for recreational purposes.
Please enjoy this project wisely,
Fuzzy
Mail questions or comments to: stove@ofuzzy1.com
Upcoming Enhancements:
-
A support ring for holding the pot.
-
A wind screen to block the wind.
-
Finish taking new photos, sorry for the lack of clarity on some photos.
The clear photos taken with an Olympus D360L using macro mode and fill-in
flash. It is a decent camera, still have to learn some of its features
and how to get red-eye out of the photos using the software.
-
If you have any other suggestions please email them to: stove@ofuzzy1.com
History:

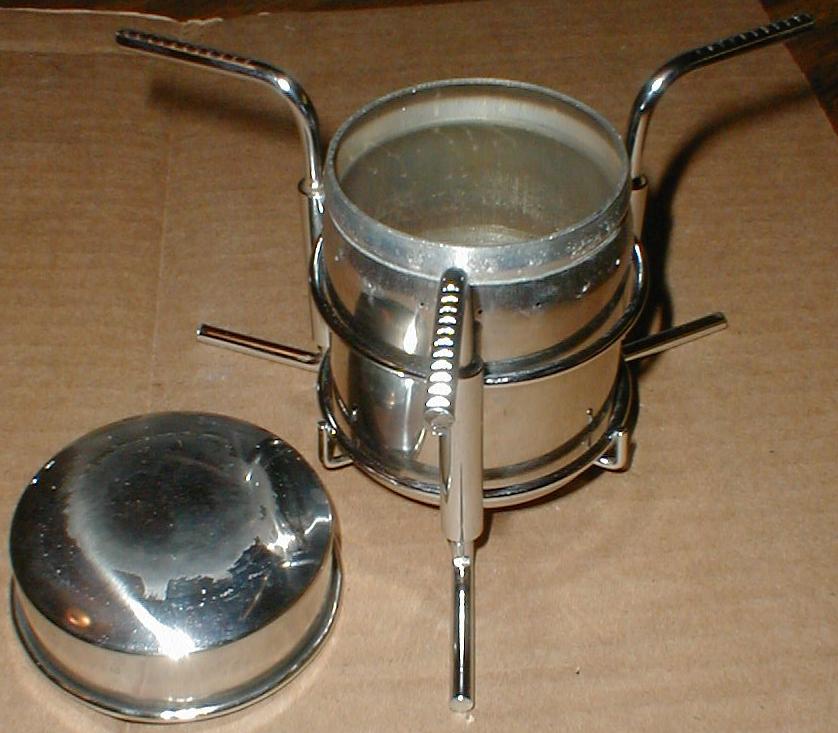
This project started because I was looking for some more of these stoves.
The Simmons Safe Sport stove. A really simple stove to use, but the place
I had bought it from no longer carries it and has no clue if they will
ever get more. Searches on the net yielded only Shioshio's
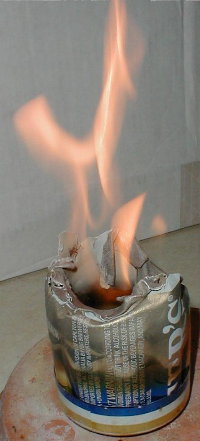
webpage. The stove in use photo was taken just as the stove got hot,
and the flames were not up to full height.
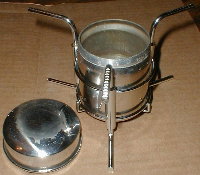
The Simmons Safe Sport Stove is slightly smaller in diameter than a
soda can. The stand is a nicely made steel wire frame. The stove is a cup
with an insert that goes almost to the bottom. With jet holes near the
top of the cup. The metal insert gets heated up and boils the alcohol,
when the fumes rise to the top and out the jets and get ignited. When all
of the jets flame up it is time to put the pot on. You heat up the fuel
by pouring in about an ounce or two and ignite it and let the flame rise
up though the center, this heats the cup up and gets the fuel to boil.
You fill it above the bottom of the insert, just like on my stove.
| | <--
Aluminum insert
/| |\
|| || <--Jets
|| ||
|| ||
|_____|
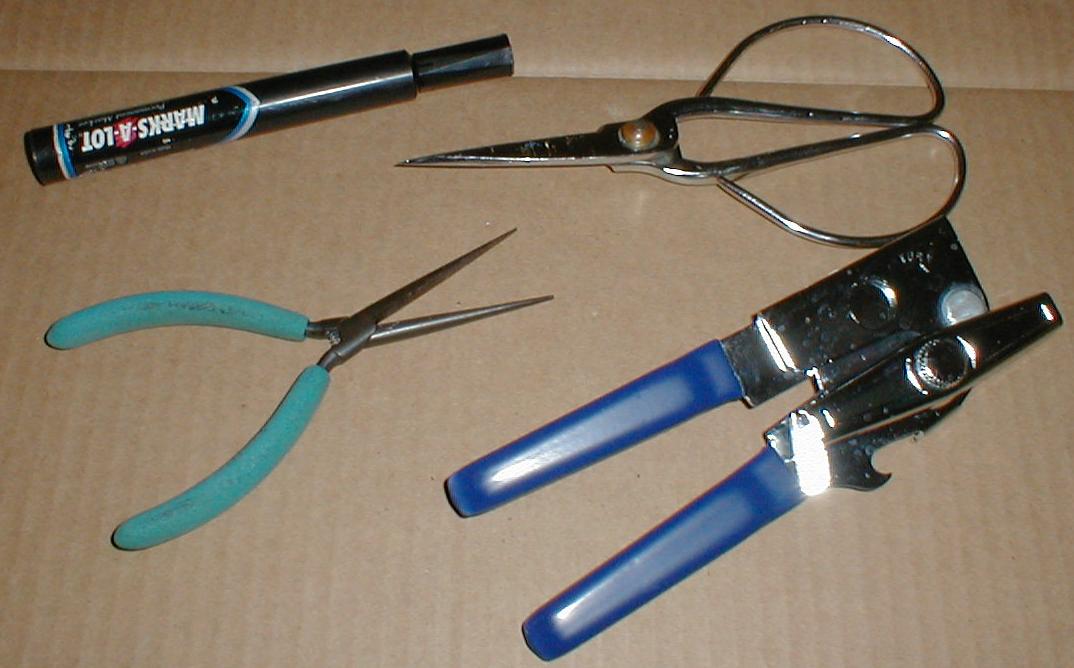
Supplies & Tools:
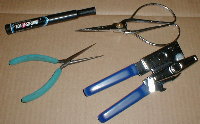
Work Gloves
Safety Glasses
A 12 oz soda can
A clean used tuna can - 6 ounce can
News paper for a quick project cleanup
Can opener
Needle nose pliers
Sharp heavy duty scissors -- not your wife's sewing scissors.
A nail or screw or ice pick - to poke some holes
Sand paper or a metal file
Magic Marker (permanent marker)
Ruler
1 pint 70% Isopropyl (Rubbing) Alcohol
Instructions - assembly:
Remember: if you mess up you will have to drink another soda! :))
-
Spread out the newspaper on the work surface, to catch the metal cuttings.
Do as I say, not as I do! :)
-
Put on and Wear Work Gloves
-
Put on and Safety Glasses
-
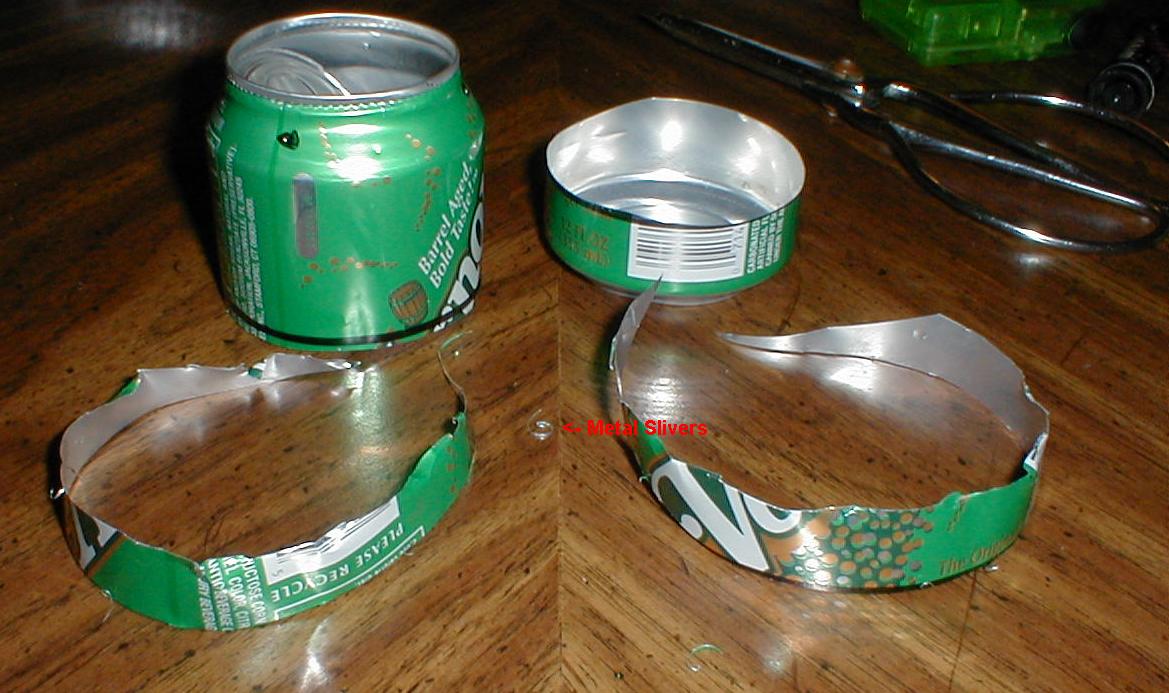
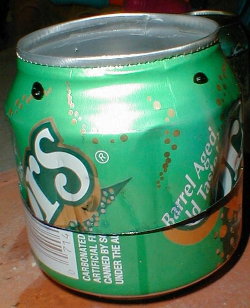
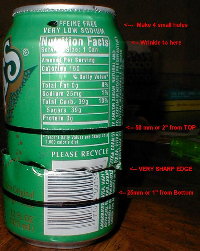
Take the scissors or nail or ice pick and poke 4 SMALL holes in
the upper lip as shown. Spaced every 90 degrees. This allows the fuel to
flow evenly while burning.
-
Use the can opener and remove the inside top where the mouth is - keeping
the thick rim, this is not easy. Some lifting of the can opener and pushing
will be needed while turning to get the gear teeth to move along. Go around
the rim a few times (3-5), this will help cut the seam better.
-
Push through the inside top and let it fall in, you may not be able to
do this until much later; after the wrinkling of the can. Watch out
for the burrs from the poked holes and other sharp edges.
-
Using the needle nose pliers rub & crush any burrs made by the can
opener and or the ice pick / nail.
-
Draw a circle around the can about 1" (25 mm) up from the bottom
and another circle 2" (50 mm) down from the top.
-
Cut the can open between the middle of these two lines be very careful
the edges will be very sharp! It is okay if it is messy, you will clean
up these in the next two steps.
-
Cut the BOTTOM portion on the line, use this one for your practice. Cut
a nice clean edge, no nicks or slivers to injure yourself on - this does
not need to be level, just very smooth.
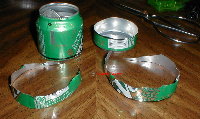
-
Take the TOP portion and cut on the line, Again make sure you have no nicks
or slivers -- the straighter the better, this is affects the leveling of
the cooking pot.
-
Using the file or sand paper smooth ALL edges and burrs.
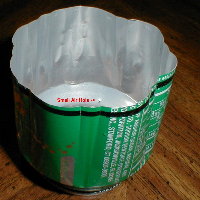
This is the TOP section shown upside down.
So you can see how to 'wrinkle' the can.
-
On the TOP portion, using the needle nose pliers gently wrinkle the "wrinkle
to here" line you want to twist the pliers to make a ruffle in the edge
of the can, you want the ruffles / wrinkles, but not to big or wide. Make
6 to 10 wrinkles.
Or
Use a rounded piece of lumber and gently dent in some grooves - be
careful not to tear the metal.
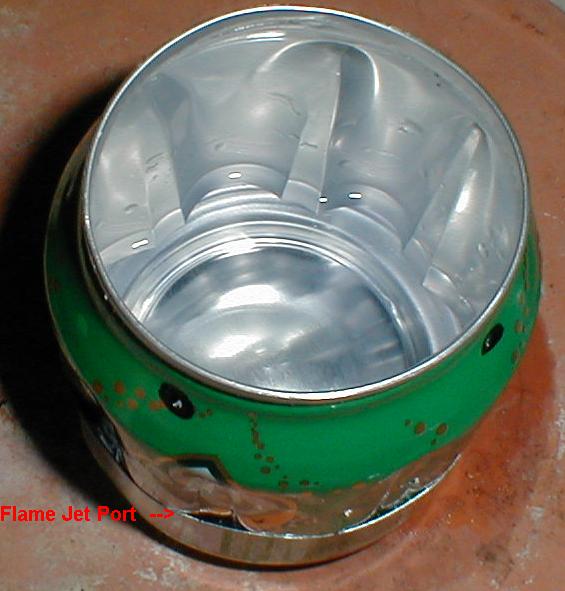
These wrinkles will do several things:
-
Make the can stronger to support the pot.
-
Allow the top half to slide into the bottom half.
-
Allow the vapors to escape up the side and act as flame jets.
-
Carefully insert the TOP portion into the BOTTOM portion.
-
If working with different sized cans, use the mouth opening as a measurement
guide. The top height should be the 1 to 1.25 the diameter of the mouth
opening. The bottom height should be 1/4 the diameter of the mouth opening.
You're done with the building portion.
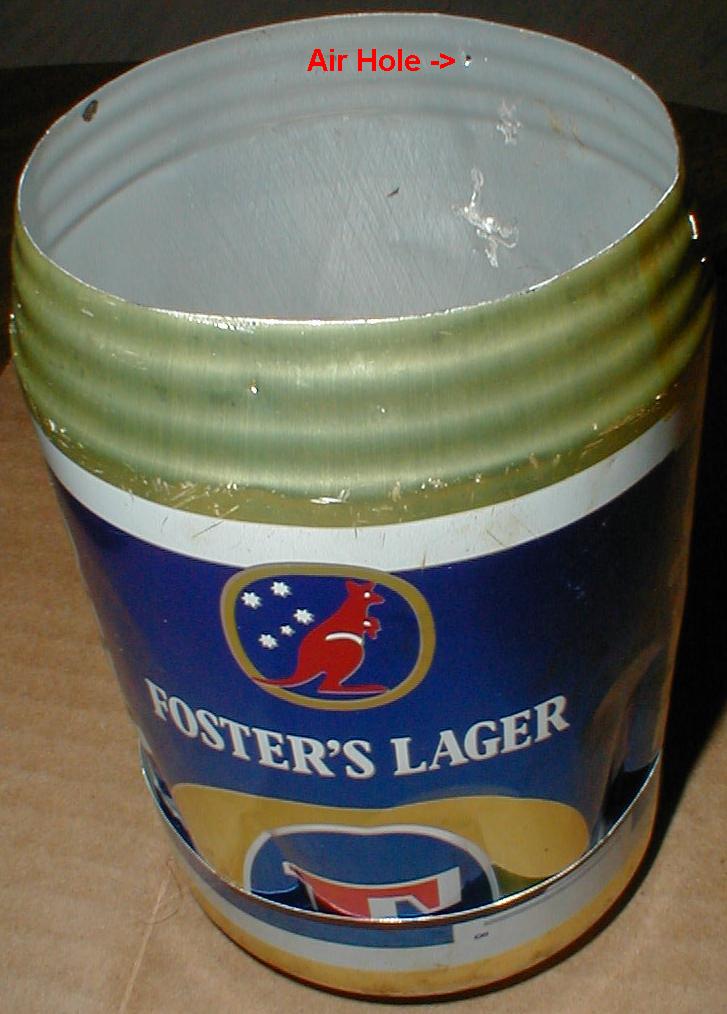
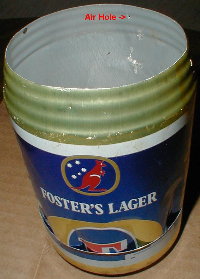
I will be trying a Foster's Beer Can - a really big can of beer, this
should allow for a taller stove and hold the pot better. See
Below!
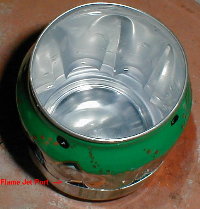
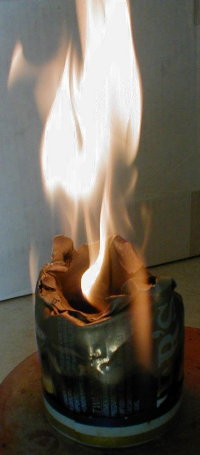
This little stove weighs less than 10 grams, ~1/3 of an ounce!
Theory of operation: (Oh, no not
some boring prattling)
Well, too bad. When you make something you should have a clue how it
works. This won't hurt too much.
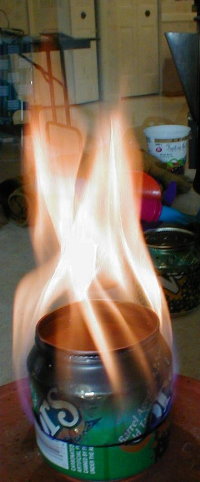
The fuel (70% Isopropyl [Rubbing] Alcohol) is poured
into the center and ignited. The flame inside the chamber causes
the top half to heat up, when the outside edge is hot enough the fuel starts
to vaporize and mists out the sides (because of the wrinkles / ruffles).
This vapor is then ignited by the flame from the center flame -- all of
this happens in about 30 seconds or less.
See, was that bad?
Instructions - use:

-
This project must be done under parental supervision!
-
DO ONLY OUTDOORS (outside) and have a fire extinguisher ready! And 5 gallon
bucket of water or garden hose.
-
Place the stove on solid level ground.
-
Use only in an approved fire pit.
-
Never use in during fire hazard conditions.
-
This stove is not designed to be left unattended!
-
I can't think of any other stupid things not to do, so don't do it if I'd
think it's stupid.
-
The fuel (70% Isopropyl [Rubbing] Alcohol) is poured
into the center fill to just above the top can's bottom lip and well below
the lower can's upper edge (on the outside).
-
Be sure no fuel is on your hands before you ignite the stove.
-
Ignite using a long match or long tipped lighter for barbecues.
-
Wait about 30 seconds, for the outside edge to start flaming. Typically
about 10-15 seconds
-
The stove needs to be conditioned - to burn off the plastic and paints
used on decorating the can. Use one ounce of fuel on letting the stove
burn without a pot on top.
-
When re-filling the stove be sure the fire is completely out and the stove
is cool -- thus avoiding an unexpected ignition of the stove.
-
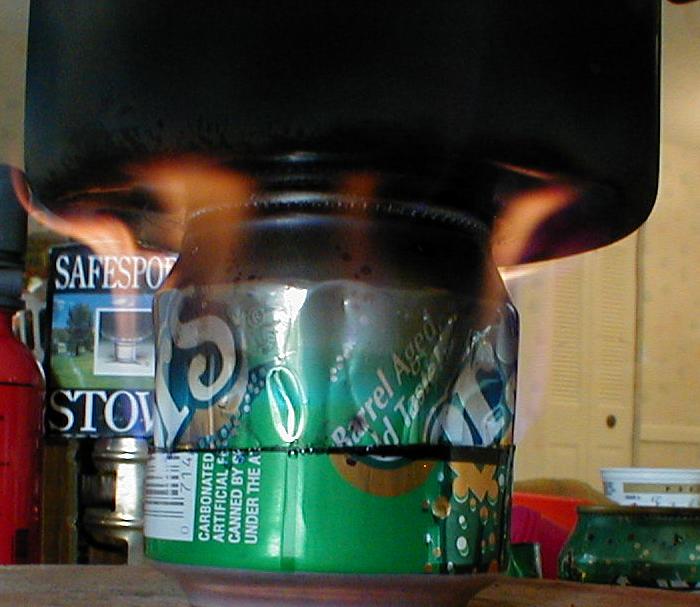
Place pot carefully centered on the stove.
-
DO NOT STIR your pot on this stove, you will need to make
a support for your pot. That is an exercise left for the student
:)) -- I've always wanted to say that. Hint: take a big tin / metal
can and cut out the top and bottom and cut notches into it. See photo
below for a nice example - triangle notches will do.
-
Extinguishing the flame, you can not blow out the flame unless the
pot is on top then a strong breath will do it. Or use a tuna can dropped
upside down on to the stove.
-
Remember the stove and pot are HOT after use.
Fuel Storage:
-
Should be done carefully.
-
My only annoyance with this design is that the fuel is not safely transported
in the stove, you must use a storage bottle. Since we are talking
about an ounce or less of alcohol, this is not a big issue. I'd pour it
into a smaller fuel bottle of contaminated fuel to be used first on the
next fire - or let it burn off.
-
Do not store ANY FUEL in beverage (water) containers, you could get them
confused and have a big problem.
-
The reason why I prefer Isopropyl [Rubbing] Alcohol is that if you should
get any on your hands it is not carcinogenic [toxic], just let it evaporate.
And help the evaporation by blowing on your hands.
-
Should the fuel leak out; it will not destroy / contaminate everything
in the backpack, just let it evaporate and most items will be unaffected.
-
Most other fuels will ruin (destroy) nylon and stink up those items that
are not destroyed, and a big mess to cleanup.
Shareware type request: If you find this project
useful AND if you don't buy any products from us, kindly send a dollar
to us at GHA-Barter Supplies, Stove project, 2240 Haverhill Rd, W. Palm
Bch., FL 33417.
This will fund future projects -- I'm looking into how to make wood
alcohol and/or isopropyl alcohol. If you have any resources information
regarding these please email them to me! stove@ofuzzy1.com
Evolution of designs:
Sorry for the bad photo. These were taken with an older camera and
many of the earlier stoves were thrown out, so this is the only photo that
exists of the evolution.

Starting from the Simmons Stove [Back], I tried to copy it.
-
[Left Front] With two cans cut and an metal insert placed
in the middle to act a vapor guide.
-
[Left Middle] A cotton wick and burner top -- that one literally
blew it's top.
-
[Right Front] A shorter version of the current stove design, it needed
the support ring to allow a pot to cook, it was to short for the flame
to develop and would quickly die out if used without the support ring.
Also, did not use a can opener to make the opening.
-
[Right Back] A taller version would not stay ignited long enough
to heat up and burn properly. The flame did not get enough oxygen.
-
[None] The final
version but without the four vent holes, it would sputter, pop and hiss
as it cooked.
-
[None] Using the Foster's Beer Can was an experience to be seen to be appreciated
[see below]
The Foster's
Mishap:
Made the stove using the above technique, from a can I found on the
side of the road - Rotten Litter Bugs! The metal had an odd (strange)
feel to it, not like the other cans and the bottom had 'rusted' / tarnished.
The thick rim had been gnawed (chewed - removed) off while using the can
opener. Still we marched on, to make the stove.
Poured some fuel in and it would not stay light so, cheated [no, I'm
not gonna tell you how - it worked on the other cans] and the flame started.
It roared up nice and big and then the top lip caved in, and then the flame
jumped even bigger. I started to get very worried! And grabbed the
big bucket of water, but waited and the can started to cave in upon itself
- the fuel was mostly used up.
The metal did not 'feel', correct, like the other cans.
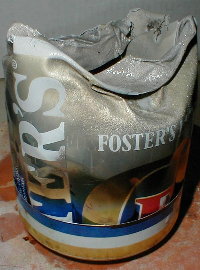
I will be on the look out for another brand of beverage using the jumbo
[big] size cans.
20DEC2000 Just found that Arizona Iced Tea makes a 700ml version,
it's not a full liter like the Foster's but it was bigger. And I will be
testing it soon.

 #7
trying a new counter
#7
trying a new counter
Disclaimers
This web page is hosted as
a courtesy by Ofuzzy1 and Ofuzzy1 is NOT responsible for any content or
liability.
All trademark names & intellectual properties belong to the respected
owner(s).
Copyright © 2000 all
rights reserved. This document may be reproduced, if and only if the link(s)
are included. www.ofuzzy1.com AND
the entire document is reproduced.
All items are be used under
adult supervision. No warranty or usability is expressed or implied. Buyer
assumes all responsibility and liability.
The user agrees that: the legal
value is redeemable to the face value paid to GHA for the advice rendered.
I.E. Free advice is worth what you pay for it, hopefully more.
This entire document is a Year
2000 information disclosure as defined in the Year 2000 Information and
Readiness Disclosure Act, S
2392.
TYPO'S shall not hinder enforcement of any article, the text is clear
enough to construe intent.
ANTI-SPAM NOTICE: ANY "ENTITY" THAT SENDS SPAM TO ANY EMAIL ADDRESS
THAT CONTAINS "OFUZZY1" AS PART OF THE EMAIL ADDRESS AGREES PAY OFUZZY1
USD$10,000 DOLLARS PER OCCURRENCE. SPAM IS DEFINED AS: unsolicited
email that does not contain email related to the topic on this page, and
/ or is not related to this purchases from this business. This definition
includes, but is not limited to, "SM-UT", Via-gra and the other medicines
(or OTC items), "at" home businesses, how to get rich quick (or other similarly
stupid offers), sales / information pitches of any kind not directly requested
by a user with the OFUZZY1 name in the address. IN SHORT, if we did not
ask for it, we do not want your email. WARNING: We do sue spammers,
and we get the $10,000 demanded, plus our shark (lawyer) gets another $10,000
for her trouble, so you lose $20,000 in one foul swoop. YOU HAVE
BEEN WARNED. Dear Spammer: We thank you for contributions to our no brainer
income growth fund - it's better than the stock market. Effective
27NOV1999.